

Latest videos

Firstly, users have to install this Mailvita Thunderbird to PST Converter for Mac application on their Mac System.This application can be used on any version of the Mac Operating System!Now, let us go through the steps.
Step 1- Search the Thunderbird to PST Converter for Mac Software.
Step 2- You can enter the location by default or by your choice.
Step 3- A preview will be generated of all the selected Thunderbird files.
Step 4- Choose the output option.
Step 5- Now, select the destination to save your converted files by clicking on the browse button.
Step 6- Click on the "convert" button.
Step 7 If you face any kind of problem you can click on the "help" button.By following these steps, a user can convert Thunderbird files to PST format.
Download the app by clicking on this link:- https://www.mailvita.com/thund....erbird-to-pst-conver

Firstly, download this Mailvita Yahoo Backup for Mac app in your system.The application can be used in any of the Mac and Windows Operating SystemsLet us now focus on the steps.
Step 1- Enter your username and password for the Yahoo account.
Step 2- Clicks on the "Authenticate user".
Step 3- Select the folder.
Step 4- Choose your choice output format.
Step 5- Click the "browse" option to save the backed-up Yahoo file.
Step 6- Finally, click on the "Backup now" button.
Step 7- If users face any hurdle, they can click on the "support" button.
Step 8- To buy the licensed version then users must click on the "Buy Now" button.
By following these steps users can go through the backing-up task quickly.
Download the app by clicking on this link:- https://www.mailvita.com/yahoo-backup-for-mac/
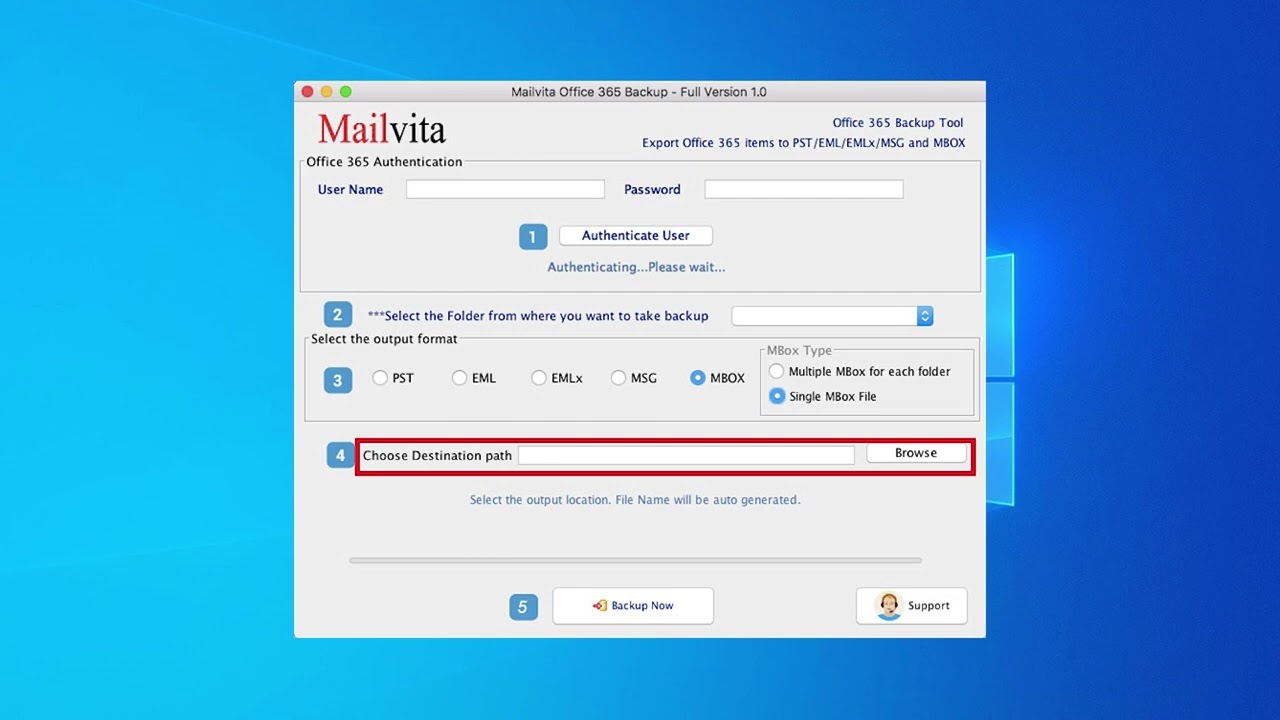
Firstly, download this Mailvita Office 365 Backup app in your system.The application can be used on any Mac Operating System!Let us now focus on the steps!
Step 1- Enter your username and password for the Office 365 account.
Step 2- After it clicks on the "Authenticate user".
Step 3- Select the folder.
Step 4- Choose your chosen output format.
Step 5- Click the "browse" option to save the backed-up Office 365 file.
Step 6- Finally, click on the "Backup now" button.
Step 7- If users face any hurdle, they can click on the "support" button.
By following these steps users can go through the backing-up task quickly.
Download the app by clicking on this link: - https://www.mailvita.com/office365-backup-for-mac/

Firstly, download this Mailvita Hotmail Backup for Mac Software in your system.The application can be used in any of the Windows or Mac Operating SystemLet us now focus on the steps.
Step 1- Enter your username and password for the Hotmail account.
Step 2- After it clicks on the "Authenticate user".
Step 3- Select the folder.
Step 4- Choose your chosen output format.
Step 5- Click on the "browse" option to save the backed-up Hotmail file.
Step 6- Finally, click on the "Backup now" button.
Step 7- If users face any hurdle, then they can click on the "support" button.
Step 8- To buy the licensed version then users must click on the "Buy Now" button.
Download the app by clicking on this link:- https://www.mailvita.com/hotmail-backup-for-mac/

Firstly, download this Mailvita G Suite Backup for Mac app in your system.The application can be used on any Mac Operating System!Let us now focus on the steps!
Step 1- Enter your username and password for the G Suite account.
Step 2- After it clicks on the "Authenticate user".
Step 3- Select the folder.
Step 4- Choose your choice output format.
Step 5- Click on the "browse" option to save the backed-up G Suite file.
Step 6- Finally, click on the "Backup now" button.
Step 7- If users face any hurdle, then they can click on the "support" button.
Step 8- To buy the licensed version then users must click on the "Buy Now" button.
Download the app by clicking on this link:- https://www.mailvita.com/gsuite-backup-for-mac/

Firstly, download this Mailvita Gmail Backup for Mac app in your system.The application can be used in any Windows or Mac Operating system!Let us now focus on the steps.
Step 1- Enter your username and password for the Gmail account.
Step 2- After it clicks on the "Authenticate user".
Step 3- Select the folder.
Step 4- Choose your choice output format.
Step 5- Click the "browse" option to save the backed-up Gmail file.
Step 6- Finally, click on the "Backup now" button.
Step 7- If users face any hurdle, they can click the "support" button.
Step 8- To buy the licensed version then users must click on the "Buy Now" button
Download the app by clicking on this link:- https://www.mailvita.com/gmail-backup-for-mac/
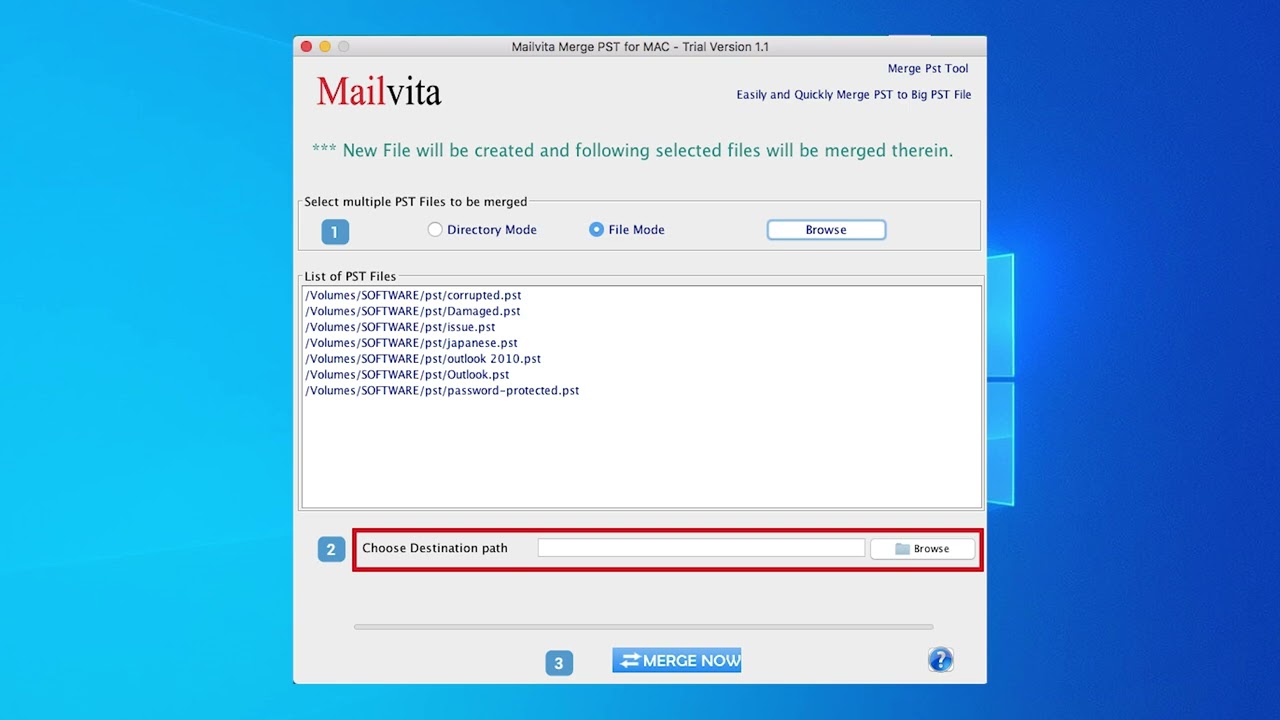
Merge PST files easily by installing the Mailvita Merge PST for Mac tool. The application can be downloaded in any version of the Mac as well as Windows Operating System. Any hurdle is not faced by a user while following the steps of merging. A user needs to follow the below-provided steps.
Step 1- First, select the PST files that you need to merge.
Step 2- You can select the Directory mode or the file mode by clicking on the browse button.
Step 3- You can have a look at the selected PST files.
Step 4- Now, choose the destination Path and click on Browse Button.
Step 5- Finally, Click on the Merge Now button.
The steps of merging can easily be followed by any user without any hurdle. The installation of Mailvita Software can easily be downloaded by any user.
Download the app by clicking on this link: - https://www.mailvita.com/merge-pst-for-mac/

Easily split your PST files while using the Mailvita Split PST for Mac tool. A user can easily split their Outlook PST files without any hurdle. A user can install the app on any of the Windows or Mac Operating systems. The structure of the files is retained as it is by this advanced solution. For splitting the PST file, a user does have to follow the below-provided steps:
Step 1- Install the app
Step 2- Add the PST files that you need to split
Step 3- Preview the selected files
Step 4- Now, enter the size that you need
Step 5- Choose the destination to save the split PST file
Step 6- Finally click on the split now button
These steps can easily be followed by any user. If users need to follow these steps then they have to install this app.
Download the app by clicking on this link:- https://www.mailvita.com/split-pst-for-mac/

Firstly, download "Mailvita MSG to EML Converter for Mac tool"Users can use this amazing tool in any of their Windows as well as Mac Operating Systems. Now, let us go through the steps:-
Step 1- Select the MSG files in either mode.
Step 2- Add the MSG files by clicking on the "browse" button.
Step 3- A preview will occur.
Step 4- Click on the "browse" button and choose the destination to save the converted files.
Step 5- Choose the Output format.
Step 6- Click on the "start converting" button.
Download the app by clicking on this link: - https://www.mailvita.com/msg-t....o-eml-converter-for-

Convert PST Files to MSG format without installing the Mac applicationFirstly, users have to install this Mailvita PST to MSG Converter for Mac Application.
Step 1- Click on the "Add PST" button and add the PST files that you want to convert.
Step 2- You can check the preview of the selected PST files from here.
Step 3- Check the checkbox if you want to ignore the empty folders.
Step 4- Choose the destination to save the files.
Step 5- Finally, click on the "convert" button.
Step 6- If you face any hurdle then click on this "help" button.
Users can use this Mac PST to MSG Converter tool in any Mac Operating System.
Download the app by clicking on this link:- https://www.mailvita.com/pst-t....o-msg-converter-for-

Firstly, users have to install this MailVita PST to MBOX Converter for Mac Application.
Step 1- Click on the "Add PST" button and add the PST files that you want to convert.
Step 2- You can check the preview of the selected PST files from here.
Step 3- Check the checkbox if you want to ignore the empty folders.
Step 4- Choose the destination to save the files.
Step 5- Finally, click on the "convert" button.
Step 6- If you face any hurdle then click on this "help" button.
Users can use this PST to MBOX Converter for Mac tool in any of the Mac Operating Systems
Download the app by clicking on this link:- https://www.mailvita.com/pst-t....o-mbox-converter-for

Firstly, users have to install this Mailvita PST to EML Converter for Mac and Win Tool.Now, let us follow the steps to convert the PST files.
Step 1- Click on the "Add PST" button and add the PST files that you want to convert.
Step 2- You can check the preview of the selected PST files from here.
Step 3- Check the checkbox if you want to ignore the empty folders.
Step 4- Select the format in which you want to convert the PST files into.
Step 5- Choose the destination to save the files.
Step 6- Finally, click on the "convert" button
Step 7- If you face any hurdle then click on this "help" button.
Download the app by clicking on this link: - https://www.mailvita.com/pst-t....o-eml-converter-for-

The administrators who want to export your EML to PST Converter for Mac. The steps we have mentioned below are regarding the conversion of EML to PST Converter for Mac Software.
Step 1 Download the software and run it on your Macintosh and Windows machine.
Step 2 Select the EML files that you want to convert
Step 3 Select the input type and it automatically appears with Directory Mode and File Mode.
Step 4 See the full preview of all the selected EML files.
Step 5 Finalize the location for saving the data in your system.
Step 6 Save the exported data at your designated place.
Step 7 Click on the "Convert" button
By following these steps, a user can Migrate EML files to PST file format.
Visit here: https://www.mailvita.com/eml-t....o-pst-converter-for-

Firstly, users have to install this Mailvita EML to MSG Converter for Mac Tool in their System. This application can be used in any Mac as well as Windows Operating SystemNow, let us go through the steps.
Step 1- Select the EML files that you want to convert
Step 2- You can choose your choice mode to convert the EML files
Step 3- After selecting the mode click on the browse button to search your choice files
Step 4 - A preview will be generated of all the selected EML files
Step 5- Now, select the destination to save your converted EML files by clicking on the browse button
Step 6- Click on the "start converting" button
Step 7- If you face any kind of problem you can click on the "support" buttonBy following these steps, a user can convert their EML Files to MSG File format.
Visit here:- https://www.mailvita.com/eml-t....o-msg-converter-for-

Firstly, users have to install this Mailvita EML to MBOX Converter for Mac Tool in their system.This application can be used in any Windows or Mac Operating System.Now, let us focus on the steps
Step 1- Select the mode at which you want to convert EML files to MBOX
Step 2- After selecting the mode click on the browse button to search your choice format
Step 3- Now, you can see all the previews of your selected EML files
Step 4- Browse the path to save your converted EML files
Step 5- Then click on the "start converting" button
Step 6- If users face any trouble, then they might click on the “Support” button
By following these steps, a user can convert their EML files to MBOX format
Visit here: https://www.mailvita.com/eml-t....o-mbox-converter-for

To import your EML file to Hotmail for mac first you need to install EML to Hotmail Importer for Mac Software.
Step 1- You have to fill in the login details "Username" and "Password" of your Hotmail account.
Step 2- Next you have to tap on the "authenticate user".
Step 3- Now you can select the input option according to yours.
Step 4- Preview your selective files.
Step 5- Choose the folder that you want to acquire to upload your EML/EMLX files.
Step 6- Then a box opens below the screen if you want to create a new folder for the Imported Hotmail account.
Step 7- In the end, hit the OK button to start the conversion.
Step 8- If a user faces any issue then they can click on the "Support" button.
Users can use this Mailvita EML to Hotmail Importer Tool in any of their Windows or Mac Operating Systems.
Visit here: https://www.mailvita.com/eml-t....o-hotmail-importer-f

First, you need to install MailVita EML to Yahoo Importer for Mac and download it accurately on your Macintosh and Windows machine.
Step 1- A display screen view on your system.
Step 2- You have to fill in the appropriate Username and Password of your account.
Step 3- When you complete the procedure tap on the “Authenticate User” button.
Step 4- Choose the input type and the two modes visible to you are directory mode or file mode.
Step 5- It will immediately provide you with a complete view of your mandatory details.
Step 6- Choose the folder where you want to load your EML files.
Step 7- Choose the option to create a new folder in Yahoo and you can upload your EML files in that folder.
Step 8- Hit the "Start Uploading" button to proceed with the conversion process.
By following these steps purchasers can import EML to Yahoo Mail format on Mac & Windows OS.
For more info visit here:- https://www.mailvita.com/eml-t....o-yahoo-importer-for

Firstly, users have to install this Mailvita EML file to G suite Importer for Mac Tool in their system. Just follow the below steps sequence-wise.
Step 1- You have to install the software on your Mac and Windows Operating System.
Step 2- Fill in the particular details with "Username" and "Password".
Step 3- Tap on the "Authenticate User" button.
Step 4- The input type option will appear on your screen with Directory mode/File mode.
Step 5- You will see the overall Preview of your imported data.
Step 6- Select the desired place for saving your data at your chosen place.
Step 7- Choose the folder where you want to store your data.
Step 8- Tap on and finally click on the "start uploading" option.
The above steps are regarding the EML file to G suite Importer on Mac OS.
Download the app by clicking on this link:- https://www.mailvita.com/eml-t....o-gsuite-importer-fo

If you want to Import EML to Gmail then you must follow the below steps.
Step 1- First you have to download the software and run it effortlessly on your Mac and Windows Operating System.
Step 2- You have to add the "Username" and "Password" to your account.
Step 3- Tap on the "Authenticate User" button.
Step 4- An input type will provide you with options of Directory mode, and File mode.
Step 5- It will immediately provide you with a full preview.
Step 6- Choose a destination place where you want to save your file.
Step 7- Hit the "Start Uploading" button.
These are the steps above which you should have to follow for the conversion from EML to Gmail importer for Mac.
Download the app by clicking on this link:- https://www.mailvita.com/eml-t....o-gmail-importer-for

Now convert OLM files to PST format reliablyFirstly, Download the Mailvita OLM to PST Converter for Mac SoftwareThe tool can be Downloaded on any Mac as well as Windows Operating system 1 Firstly click on the "Add" button to add your OLM files. Step 2 Get a preview of all these selected files hereStep 3 Choose the destination path at which you want to save the filesStep 4 Now, finally click on generate option for converting the file by following these steps a user can export/convert OLM files to PST format.
Finally, Click on Generate OptionThank you! Download the app by clicking on this link: - https://www.mailvita.com/olm-t....o-pst-converter-for-
